
Custom Model Building Services for Model Railroaders Everywhere
The Southern Pacific Railroad's
Clovis Branch, circa 1951
ABOUT MY RAILROAD... My current layout represents the Southern Pacific Railroad’s Clovis Branch - a 24.5 mile branch line running from Fresno to Friant in southern California. The layout is HO scale, and set in the summer of 1951.I started my version of The Clovis Branch in early 2018. I was unhappy with my previous layout for various reasons. While considering what I wanted in a model railway I decided I wanted to model something more manageable - both to build and to operate - while still taking advantage of my generous layout space.While looking for a new prototype to pursue, I discussed several ideas with friends. One of them suggested I have a look at a book on the SP's Clovis Branch, “Serving the Golden Empire - Branch Line Style” by Joe Dale Morris.Here, I found lots to love.The Clovis Branch served many produce-packing houses, a couple of wineries, a large cotton cooperative, a quarry that supplied ballast to the railroad, and a variety of the typical customers found in any small town. Since I enjoy building rolling stock - so much so that I now run businesses building freight cars for others and manufacturing resin roling stock kits - a model of this branch would be the perfect setting for a variety of equipment. At the same time, the SP ran small steam on this branch - it was an ideal home for the 2-6-0s that crews liked to call the “Valley Malleys” - and my modest roster looks just right pulling modest, layout-friendly way-freights and produce extras.The line itself offered a variety of modelling challenges, too - from vineyards and other farms, to a range of industrial, commercial, railroad and residential structures. There’s even a segment of in-street running as the railroad leaves Fresno, plus a connection with an interurban line (abandoned by my chosen era but resurrected on my layout).The layout is up and running, and has proven to offer a variety of operation too. It works beautifully for solo operating sessions, which was a consideration given that I live a long way from most of my friends. But when we are able to get together, the layout also supports a “harvest season” session with multiple freights and 4-6 operators. Regardless of the number of people taking part, operating sessions are relaxing yet rewarding.All in all, it’s been a terrific journey, and it keeps going.The JD Morris book included enough track diagrams and photos to get me started with confidence. But I’ve learned a lot about the SP and the Clovis Branch since then. Unlike previous efforts, this layout combines a relaxed plan with a generous space, which has made it relatively easy to accommodate changes as I go about Serving the Golden Empire, Branch Line Style ...Please visit often. |
THE LATEST BLOG POST...
A new kit and some other goodiesMarch 5th, 2025 First of all, Tariffs First up, a new kit   The NP/SP&S '51 design 40' boxcar. In a bit of a departure from the standard ’37 AAR design, the NP built some 1500 boxcars, along with 500 cars for the SP&S, that did use much of the '37 AAR guidelines, featured a continuous side sill, making for a unique looking car. The kit includes both lettering options and has all the things you've come to expect from Yarmouth Model Works. For the NYC modelers  and The Despatch 40' roof  And some fun etched bits https://www.yarmouthmodelworks.com/index.php/Products/YMW-406 USRA style lateral support brackets  and another style of 2 rung sill step  All these items are now on the website and available for purchase Follow up on the Tariff blog postFebruary 4th, 2025 So we've been given a reprieve, for now. I want to first thank all those people who voiced support for me and my fellow countrymen as we dealt with this threat. I was touched very deeply and my faith in people was reaffirmed. I also want to drive home how massive a sense of betrayal most Canadians are feeling right now towards what we thought was our closest ally. This is my grandfather; .jpg) Lt Cmd G.M. Oliver on the bridge of the landing craft he commanded for the Normandy invasion. L%20166%20FB.jpg) These were American built vessels that were Lend-Leased to the Royal Navy and 20 were then seconded to the Royal Canadian Navy for invasion duty. It's also important to say, for the most part our issue is not with the American people, but with the current presidential administration. Hopefully this chapter is over. Now onto better news.   My heartfelt thanks for all your support. It got me through some difficult hours. Tariffs!February 2nd, 2025 As of this date, Feb 2, 2025, Trump has decided to impose a 25% tariff on all Canadian goods, save oil. Effective Tuesday the 4th. One way or another, everything I sell to my US customers will likely windup costing 25% more. Whether I have to add it to the bill and submit the tariffs to the US government, or the customer has to pay the tariff to the shipper before receiving his package. If the policies announced remain in force through the summer, I will not be attending any of the RPMs I usually frequent. Let's talk about TariffsJanuary 10th, 2025 I've been avoiding writing about this contentious issue, in part because I'd been hoping that is was a lot of bluster from incoming President Trump, but it's looking more and more likely. Simply put, the threatened tariffs will raise the end cost of almost everything we consume in this shared hobby of ours. How the tariffs will be collected remains to be seen, but most likely for mail order items such as my products, it'll be collected by the post office before they hand over to you your package. I'm hoping that wiser heads prevail in this.   Stay tuned NP reefer trucksOctober 2nd, 2024 For you fellows looking to acquire an NP reefer kit from me in Naperville at the RPM; By special arrangement with Brian Leppert of Tahoe Model Works, we have come into possession of a limited number of the NP T-section Andrews trucks.  These trucks are frames only, and will be sold on a first come first served basis. $3.50 a pair ACF proprietary roofSeptember 23rd, 2024 Ben Scanlon was asking for this  New kits for Naperville 2024September 13th, 2024 Where as the summer gone? https://www.rpmconference.com/ It's great to see that Frank Hodina has resurrected the granddaddy of the RPMs. YMW #143.1 CNR wood sheathed reefer  YMW #143.2 GTW wood sheathed reefer  YMW #144 NP wood sheathed reefer  All three feature, one piece body castings and new underframe patterns, photo etched details including prototype specific ladders, laser cut running boards, Tahoe Model Works truck frames and cutom decals from Black Cat Publishing. https://www.yarmouthmodelworks.com/ Come and say hi at the RPM Some layout improvementJune 30th, 2024 As with so many things in my life, this wasn't planned but just sorta presented itself to me. I was online, poking around for something, don't recall what, when I came across this; https://www.modelrailroadcontrolsystems.com/mp1-version-2-switch-motor/ And I was enthralled.  I have relatively narrow aisles in places, and the choke rods were forever getting caught in clothing and generally annoying me and my operators. Exactly what the doctor ordered. The fascia mount is simple, just drill a 1.5" hole in the fascia for the toggle cup and screw in place  Pass a piece of piano wire up through the existing hole in the roadbed and throwbar, and screw the motor in place, after some brief fiddling back and forth. I found that a piece of double sided tape on the motor helped keep things in place until I could get a screw in. Wiring is simple 12 VDC one lead to the common connection, one lead to the toggle. 2 leads back from the toggle to the 2 options on the toggle The 2 pole terminal makes it easy for me to run a daisy chain to the other motors along the way  There are terminal screws for frog polarity should one desire, I use Hex Frog Juicers, so that's a nonissue. The only thing I struggled with was the actual mounting screws Anyway, one down 51 to go All expectations surpassedJune 7th, 2024 As of today, Friday June 7, 24, advance sales of the helium tank car have ended. My sincere gratitude to all who have committed to buying the kit. Deliveries will start late July Again thanks to everyone for the support  Now available on the websiteJune 5th, 2024 Three new kits are now on the website for immediate sale https://www.yarmouthmodelworks.com/index.php/ResinModelKits/YMW-142-1 https://www.yarmouthmodelworks.com/index.php/ResinModelKits/YMW-142-2    Also Advance sales of the Helium tankcar have surpassed expectations. If you have not made your purchase and intend to do so, I would act quickly. Only 100 kits are being made and over 70 have been purchased Helium tankcar preordersMay 17th, 2024 In a departure from our usual procedure, it has been decided to accept
pre-orders for the Helium Tankcar kit.

Well I'm excited...May 11th, 2024 I hope you are too. From this,  To this,  It's taken over 7 years and many iterations to get to this point, but this model is done! I expect that the kit will be released for sale at the St Louis RPM in July, and then it'll be on the website. And for fun, this photo was arguably the most useful photo I found in figuring out this model  New kits for the NERPMMay 9th, 2024 These 3 kits will be released at this years New England RPM in Springfield 140.1 Great Northern 50' rebuild, Empire Builder decals $65.00  142.1 NYC Lot 858 40' boxcar Gothic lettering $65.00  142.2 NYC Lot 858 40' boxcar "Cigarband " lettering $65.00  The Lot 858 cars were the last 40' cars built for the NYC. They used the Despatch roof and ends for a unique looking car Progress this dayApril 22nd, 2024 It's more than a viscous rumour.  The parts for the helium car are in the house and work has begun on the pilot model. The kit will be released later this year, either St Louis RPM or Naperville. Watch online for annoucements Stop the PressesDecember 24th, 2023 More like stop the model making. Overnight it was pointed out to me that the domes on the winecar look out of proportion to the prototype photo.   And I realized that the individual was right. So it's a couple of steps back and try again Things to look forward to in 2024December 23rd, 2023 2023 has been a good year. We have a number of projects that we're working on which should be ready sometime in the coming year Helium tank car .jpg)   We've been working for a couple of years now on this, refining the etchings and the 3D printed pattern parts. It's now nearing the finish line. Reading 50' stretched boxcars   We're looking at 2-3 variants to offer of this car. One thing we're going to try, is to take a page from the military modeling world and create a paint mask for the Reading banner, rather than give the modeler and large awkward decal to wrestle with. NYC lot 858 The only 40' cars built for the NYC that used the distinctive Despatch Shops roof and ends.   Northern Pacific 90000 reefer Working with Aaron Gjermundson, we're creating a all new one piece body kit for this wood sheathed reefer.   CNR wood sheathed reefer  And the one I'm really excited about    So my thanks to all who have supported me over the years. We'll keep working on creating high quality resin kits for a few years yet to come Enjoy your holidays and have a great 2024 Wow, just WowOctober 25th, 2023 The custom painter we're using over in the UK, just sent me these photos of the work he's been doing for me, for customers who requested painted figures. To say I'm pleased is an understatement 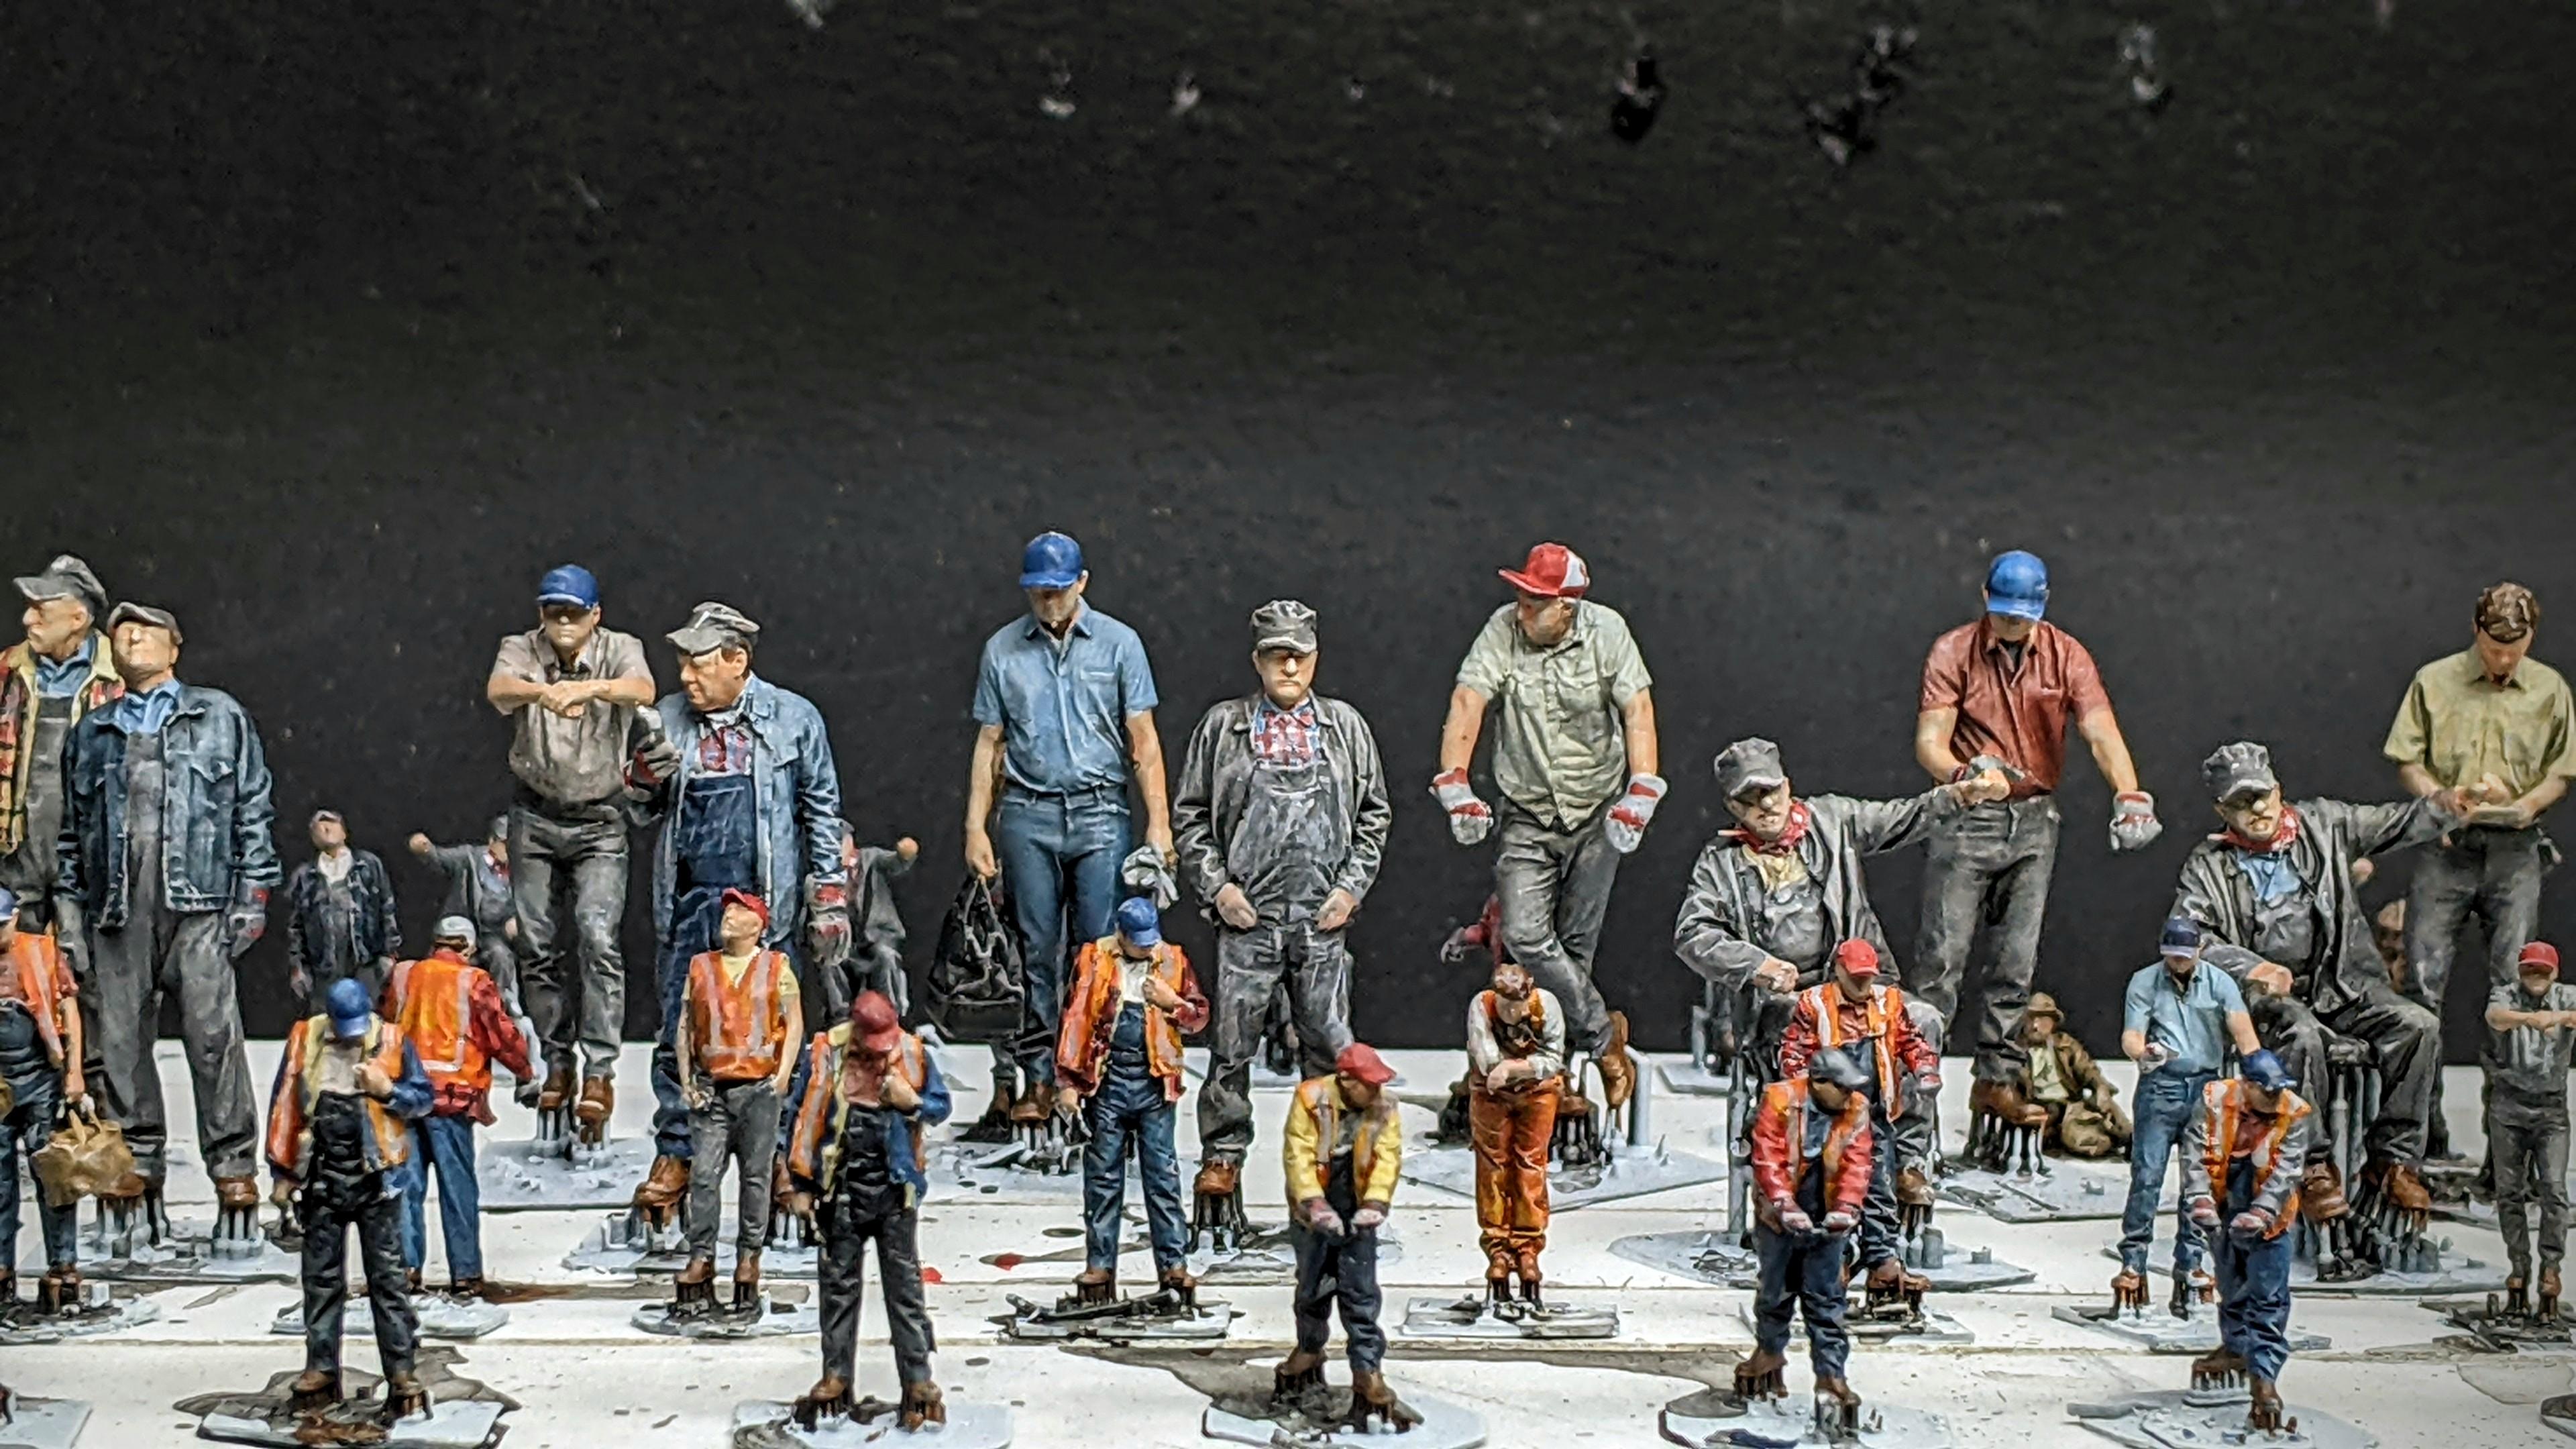  Can't wait to see these in person Couple of new things from Yarmouth Model WorksOctober 1st, 2023 Continuing in the vein of supplying modelers with what is becoming hard to find these days, we have 2 new basic body shells for those kitbashing projects  https://www.yarmouthmodelworks.com/index.php/Products/B12PS  Now available on the website for $25.00 each plus postage Well that's a bit of an OooopppsSeptember 25th, 2023
 However, this morning, I discovered a rather serious booboo on the website. The figure prices listed, show the British Pound value in USD. So I will be spending a few hours fixing that error. Not sure how that one got by us, but there you have it. And we're live!July 23rd, 2023 The website for Modelu figures is now live and taking orders The site is not fully complete and there are items to be added.    New items in time for the St Louis RPMJuly 1st, 2023 It's been both frustrating and exciting in the YMW shops. For reasons I won't go into, the website for the Modelu figures has been delayed many months. At this time I still don't know when the website will be active.  In the good news department, we have 5 new kits that will be released at the St Louis RPM.  YMW-138 NYC 40' steel rebuild  YMW-139 NYC 1 1/2 door raised roof rebuild  And 2 all new resin kits. One piece resin cast bodies, custom etchings , TMW trucks and all new decal artwork from National Scale Car YMW-140 Great Northern 50' rebuild single door  YMW-141 Great Northern 50' rebuild double door  Each kit will retail for $65.00 USD and will be available through the website shortly after the RPM And as a wee bit of a teaser  A helium tank car kit. See you in St Louis! Big news!April 8th, 2023 I'm thrilled to announce that Yarmouth Model Works will be the first "stockist" in North America to stock the Modelu line of figures Initially I will be only stocking the North American figures, mostly in HO, but some O scale as well.    It will take a few weeks for the website to up and running, as well as for initial inventory to arrive from the UK. Bookmark YMW-Modelu.com and checkin in a few weeks. Let's talk about paintApril 8th, 2023 As many of you know, I'm a big user of Scalecoat paint. Sadly, Minuteman Models, has closed his doors over the winter. So there ends that supply line. I have heard that someone is looking at purchasing the product line and rereleasing the paint into the market. Only time will tell if that comes to fruition. I still have a large inventory of Scalecoat paint for my own uses, but I feel that I have to now look to alternative paints to recommend for use on future model kit releases. Not much point in suggesting something that maybe hard or impossible to source. Now to the paints I'm having good success with  These are the first acrylics I've worked with that didn't leave me swearing half way through the paint job. And the best part is, there's a great selection of red/browns. The consistency is constant from colour to colour. AK RealColor  This is an Acrylic Lacquer. (The nuance is lost on me too) This is lovely paint to work worth. It handles very much like Floquil or Scalecoat. I make a point of thinning this with the brand name thinner. Saves a lot of potential grief Mr Color  My new favorite paint. This stuff is a delight to work with. When combined with Mr Color leveling thinner, delightful results occur. And it is opaque, which can not be said for many acrylics these days. Some creativity maybe required to achieve some of the red/browns we desire, but it is well worth the effort. All three of these paints dry relatively quickly. So no more waiting a week or more for Scalecoat to fully cure. It is well worth exploring these alternatives. There are alternatives to our old tried and true products, and you may discover some techniques. The resin elves have been busyFebruary 10th, 2023 Here it is  From a fabulous set of patterns by Aaron Gjermundson. Pressure cast resin, injection molded sill steps, custom decals from Black Cat, custom etchings, laser cut running board, Tahoe Model Works Andrews truck frames and a tiny 3D printed brake staff support. The kit will be on the website sometime next week, $60.00 USD plus postage. Another Successful Binbrook RPM!February 6th, 2023 It's February, which means 2 critical things,       |